Azure Command Line Interface (Azure CLI) Series 3: Practical Experience on Usage and Functionalities.

A strategic senior product and solution manager with proven accomplishments in driving growth and increasing business revenue with a proven history of driving product development and awareness which is illustrated in over 10 years of success within the product development and sales landscape in the Financial and Information Technology (IT) space in Nigeria.
I am delighted to welcome you to the third series on the Azure CLI topic. We have gone far with a background understanding of the concept of Azure CLI. In this learning, we will be going further by going into practical learning on the usage and functionalities of Azure CLI in resource management and creation on Azure. This is the point where we will see everything we have learnt so far in action. This promises to be a great learning experience. Let's look at the prerequisite
Installation of the Azure CLI (Please refer to the first series for further guidance).
To finish the tasks in this tutorial, you may alternatively use Azure Cloud Shell if you'd like. Through your browser, you may interact with the Azure Cloud Shell environment. This is with the assumption that there is an existing Azure account.
Use one of these techniques to launch Cloud Shell:
Go to CloudShell web to launch Cloud Shell.

You can also access the CloudShell from the Azure Portal.
In the top right corner of the Azure portal, click the Cloud Shell icon.


- Follow these steps if you are using a local installation of the Azure CLI on your system:
Open the Window PowerShell on your local computer.
Use the az login command to log in, then follow the instructions in your terminal to finish the authentication procedure.

This shows that you have access to your Azure subscription from your local computer.
AZURE RESOURCE CREATION USING CLI.
When creating a new Azure resource, typically, there are three high-level steps:
Connect to your Azure subscription.
Create the resource.
Verify that creation was successful.
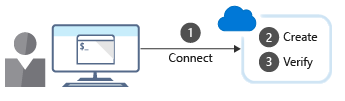
Source: Microsoft Learn.
1. Connect
Because you're working with a local Azure CLI installation, you'll need to authenticate before you can execute Azure commands.
You do it by using the Azure CLI login command:
Azure CLICopy
az login
Azure CLI will typically launch your default browser to open the Azure sign-in page.
If it doesn't work, follow the command-line instructions, and enter an authorization code in the Enter Code dialog box.
After a successful sign-in, you'll be connected to your Azure subscription. This step has been taken in the prerequisite guideline earlier.
2. Create
You'll often need to create a new resource group before you create a new Azure service. So we'll use resource groups as an example to show how to create Azure resources from the Azure CLI. The Azure CLI "group create" command creates a resource group.
Take note of the following:
You need to specify a name and location in the command you are to run.
The name parameter must be unique within your subscription.
The location parameter determines where the metadata for your resource group will be stored.
You use strings like "West US," "North Europe," or "West India" to specify the location.
Instead, you can use single-word equivalents, such as "westus," "northeurope," or "westindia."
The core syntax to create a resource group is:
az group create --name <name> --location <location>
Modify this command syntax and run it on the CLI in your local system through the Powershell tool.
Example: To create a resource group, take the name of the resource group to be "AzureCLIDemo" and the location to be "uksouth".
az group create --name AzureCLIDemo --location uksouth
Copy and run the command.

Check out these resources from the Azure portal for confirmation

3. Verify installation
For many Azure resources, Azure CLI provides a list subcommand to get resource details. For example, the Azure CLI group list command lists your Azure resource groups. It's helpful to verify whether resource group creation was successful not necessarily by confirmation from the Azure Portal but with CLI. Run the below command to verify your installation.
az group list
You will be able to see the list of the resource groups in your Azure environment.

To get more concise information, you can format the output as a simple table:
az group list --output table

If you have several items in the group list, you can filter the return values by adding a query option using, for example, the following command:
az group list --query "[?name == '<rg name>']"
Take "DefaultResourceGroup-EUS" for example from the list resource group listed above. modify the above command and run to verify the item in the resource group.
az group list --query "[?name == 'DefaultResourceGroup-EUS']"
There are no resources in the resources group. Otherwise, It would have been specified.

Using Azure CLI in scripts
To use Azure CLI commands in scripts, you'll need to be aware of any issues around the shell or environment you use to run the script. For example, in a bash shell, you can use the following syntax when setting variables:
Azure CLI
variable="value"
variable=integer
If you use a PowerShell environment for running Azure CLI scripts, you'll need to use the following syntax for variables:
PowerShell.
$variable="value"
$variable=integer
Exercise 2: Creating Virtual Machines(VM) with Azure CLI.
In Creating Azure VM, the first step is to create the resource group the VM will reside in. As established in the first exercise, we created a resource group with the command below.
az group create --name AzureCLIDemo --location uksouth

Now, let's deploy a virtual machine. We'll use a simple Ubuntu Server image for this example with running the below command.
We must take note of every component of the command to be used to create the VM with the CLI. The components of the command script are:
az vm create: This is an indication of what we want to our intention which is to create VM.
--resource-group AzureCLIDemo: This is an indication that we intend to have the VM located in the specified resource named "AzureCLIDemo".
--name CLIVM: This is indicative of the name given to the VM to be created which is "CLIVM".
--image ubuntu2204: This is the specified operating system of the VM to be created which Linux VM.
--admin-username azureuser: This is to specify the Username of the VM user.
--admin-password Password12345: This is to specify the password that would be used to access the VM by the user.Putting everything together will give you the below command script. Copy this command line and run it on Azure Powershell.
az vm create --resource-group AzureCLIDemo --name CLIVM --image ubuntu2204 --admin-username azureuser --admin-password Password123#
Running the above Command on Powershell will give you the below result

Now you have created the VM. How do you access the VM Created?
Accessing Azure VM Through the CLI Interface.
To access the VM you have created, Let us assume that you do not know vital information about the created VM except for the name of the VM and the resource group. You need to follow the following steps.
Access the Public IP address of the VM from the Azure portal.

Use SSH to connect to the Linux VM:
Run the following command, with the VM Public IP address obtained from the Azure portal:
ssh azureuser@172.167.66.55Type "yes" in response to the question of authentication and input your password.

You will get access to the Linux VM you have created in your Azure Environment.

You will agree with me that this has been an intresting practical learning on the Usage of Azure CLI for resource deployment. In subsequent series, we would delve more into hands on practical learning of this topic. Looking forward to learning with you in the next series of the Topic.


